Likely going to be selling some prints at this years Vet Fest, so figured this was a great excuse to get back to some of the more patriotic art I used to make much for often. Being that I've been in TX over a year now, I thought I'd dedicate a pinup to the Lone Star State.
This was created in Photoshop from concept sketch to final render.
Wednesday, August 21, 2019
Tuesday, August 20, 2019
Star Wars: The Old Republic -Asset Dump 01
Hi all!
Being how I've now moved on since my Contract at BioWare, I thought I'd post up some of the first assets I got to make for Star Wars: The Old Republic.
Note:
Under each image is a direct link to the asset on my ArtStation if you care to check it out further.
Asset 01:
This was part of my art test for the weapon/prop artist position. The test was to see how I would not only build the asset, but also design something new that fit correctly into the Star Wars universe. Being a fan of both weapons and Star Wars, I knew that most blasters start off with a WWII era of firearm with other parts of different weapons or scopes attached to make them look "sci-fi".
Asset 02:
Also part of the art test, this was pair of binoculars I created also of my own design. Similar to the blaster, doing some research proved that previously created binoculars in the Star Wars films often started with a 60s-70s era of camera with additional parts glued over top. So using Luke's binoculars from "A New Hope" as inspiration, I found a camera body I liked and then added some lenses and parts from appliances as well as some of the pieces used in the film versions of other binoculars.
Being how I've now moved on since my Contract at BioWare, I thought I'd post up some of the first assets I got to make for Star Wars: The Old Republic.
Note:
Under each image is a direct link to the asset on my ArtStation if you care to check it out further.
Asset 01:
This was part of my art test for the weapon/prop artist position. The test was to see how I would not only build the asset, but also design something new that fit correctly into the Star Wars universe. Being a fan of both weapons and Star Wars, I knew that most blasters start off with a WWII era of firearm with other parts of different weapons or scopes attached to make them look "sci-fi".
Also part of the art test, this was pair of binoculars I created also of my own design. Similar to the blaster, doing some research proved that previously created binoculars in the Star Wars films often started with a 60s-70s era of camera with additional parts glued over top. So using Luke's binoculars from "A New Hope" as inspiration, I found a camera body I liked and then added some lenses and parts from appliances as well as some of the pieces used in the film versions of other binoculars.
Asset 03:
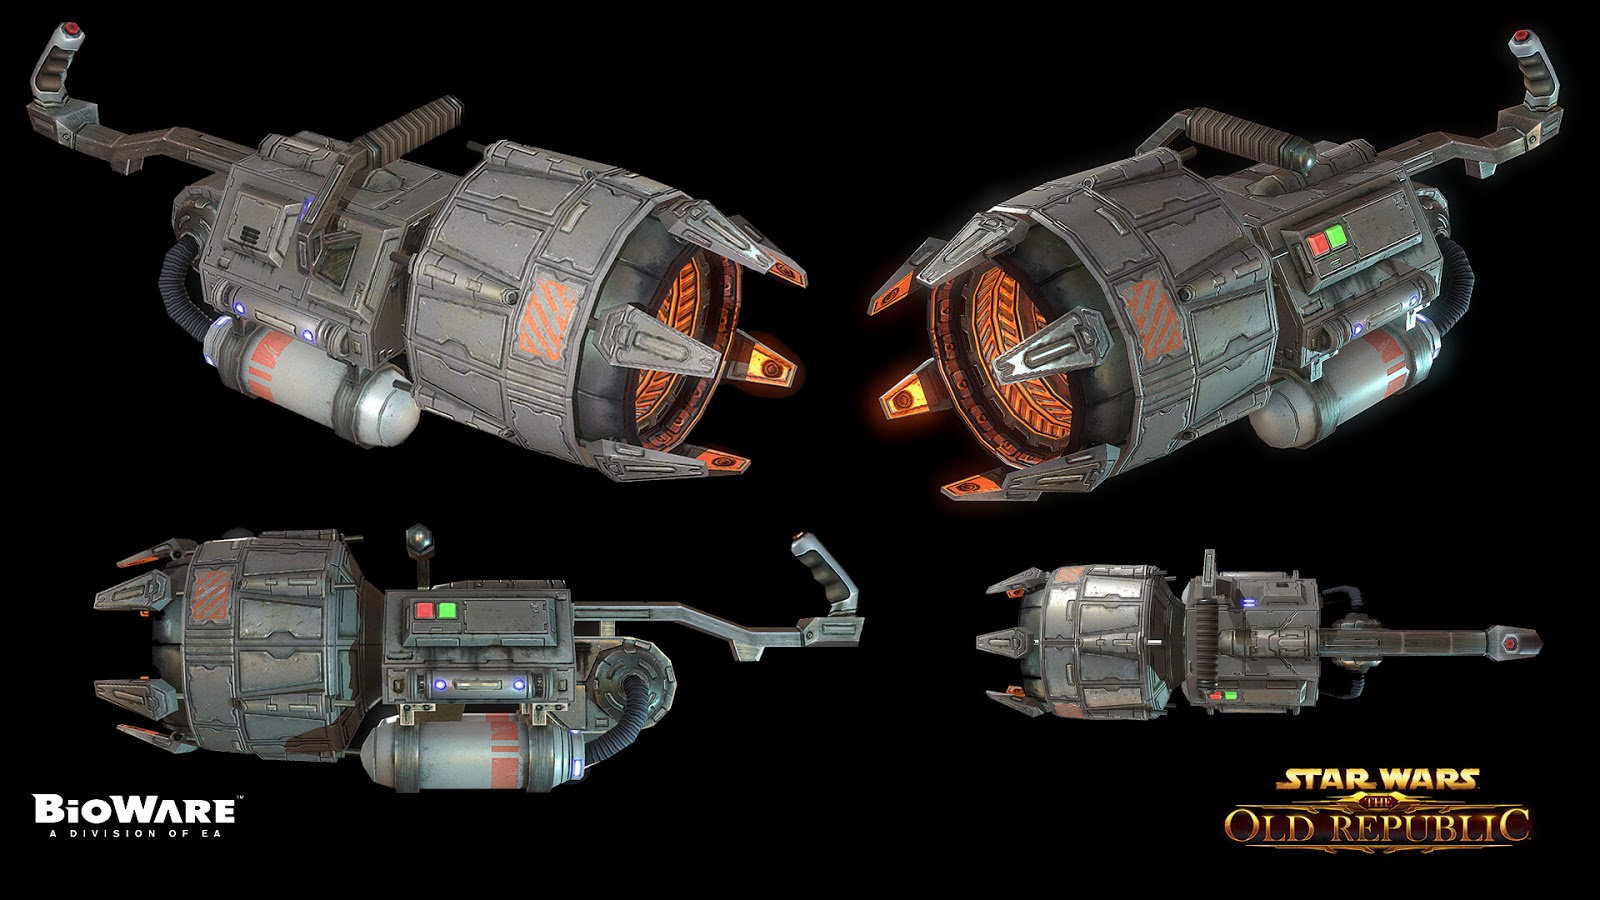
This was the very first thing I created once starting my contract on Star Wars: The Old Republic. I was told to take inspiration from the "Siege Cannon" seen at the end of "The Last Jedi". (Everyone's favorite SW film lol) Beyond that, I had the pre-determined hand positions for this type of weapon and some direction from my supervisor, Brad Lewis, who helped me dial in the design.
Asset 04:
Lastly for this post, is the first "mount" I created for the game. This one was based on a couple well crafted, pencil sketches from Brad Lewis. He gave me some freedom with the textures which I pulled inspiration from both the Y-Wing and the Snow Speeder seen in "The Empire Strikes Back".
More to come...
I have several more assets from my time at BioWare that I'll be sharing as time permits. For those that don't know, I'm no longer with BioWare and wanted to wait awhile before showcasing some of the things I made last year. I know BioWare has been under a lot of scrutiny in recent months for a multiple of reasons I won't get into here, however I hope like myself anyone reading this will continue to wish them the best in righting the ship and returning to making excellent products.
Labels:
3D gun,
binoculars,
bioware,
blaster,
conceptart,
digital art,
EA Austin,
EA Games,
Electronic Arts,
game art,
game concept,
game gun,
game model,
lowpoly,
mount,
polygon,
star wars,
starwars,
weapon concept
Wednesday, August 29, 2018
I am at BioWare!!
Oh wow, it's been a LONG time since I've posted a blog post! I feel like writing about my craft and the industry is a great outlet for me to remind myself how great it is that I get to do what I love every day. So expect to see some posts a bit more frequently here on Drawn with Lead!
So to start off on the right note, if you haven't seen through my other social media outlets, I am currently employed by BioWare in Austin TX. :)
I am currently a Prop/Weapon Artist on Star Wars: The Old Republic. I have been here about three months now and it's been a very rewarding experience. I have a great mentor who's taught me a ton about 3DS Max and some pretty awesome techniques as well as just giving me a better understanding of what to look for when texturing different types of metals and materials that goes well beyond the standard "yeah, it's metal". Probably the most exciting aspect of the job is that I get to not only create 3D weapons, props, droids and vehicles that go into an awesome Star Wars IP, but I have also been trusted to concept some of my own ideas and get them into the game. To top this off, once assets are approved by Lucas Film, these assets become canon! I mean, what Star War nerd hasn't dreamed about creating things for the most awesome sci-fi IP in the galaxy?!?!
It's been a very rewarding experience so far, and I know I have a lot to look forward to going into next year. I will post some of the assets I've made once they go live on the SWTOR market place.
That's all for now, just wanted to update my blog with the big news. And of course, may the force be with you!
So to start off on the right note, if you haven't seen through my other social media outlets, I am currently employed by BioWare in Austin TX. :)
I am currently a Prop/Weapon Artist on Star Wars: The Old Republic. I have been here about three months now and it's been a very rewarding experience. I have a great mentor who's taught me a ton about 3DS Max and some pretty awesome techniques as well as just giving me a better understanding of what to look for when texturing different types of metals and materials that goes well beyond the standard "yeah, it's metal". Probably the most exciting aspect of the job is that I get to not only create 3D weapons, props, droids and vehicles that go into an awesome Star Wars IP, but I have also been trusted to concept some of my own ideas and get them into the game. To top this off, once assets are approved by Lucas Film, these assets become canon! I mean, what Star War nerd hasn't dreamed about creating things for the most awesome sci-fi IP in the galaxy?!?!
It's been a very rewarding experience so far, and I know I have a lot to look forward to going into next year. I will post some of the assets I've made once they go live on the SWTOR market place.
That's all for now, just wanted to update my blog with the big news. And of course, may the force be with you!
Tuesday, August 16, 2016
Photo Source Textures VS. Han Painted Textures
I have recently started a Block tradition at the school for creating a Link shield each class to talk about creating simple props for games. I have found that some students like this little asset because it allows them to play with the idea of making something in low-poly 3D with an asset they find very familiar. I mean seriously, who doesn't want to make a Zelda asset?
This Block I went in a more gritty (realistic) approach to the Twilight Princess Link shield. I used photos of wood, metals, and grime to edit together a PBR constructed material. You can see that just by using photo sourced texture, it really makes the iconic shield look far more realistic and medieval than what we are used to seeing in most Zelda games.
Here is the ArtStation post:
Last Block I did a much more stylized "N64" style version of Link's shield. Lower poly count and very simple construction works nicely when coupled with hand painted textures that are deliberately trying to make the asset feel like it's from a "cartoony" world. The asset pictured only uses a simple diffuse map which tends to work very well when going with this simple art direction. Just as cool and as much fun to create as the realistic shield pictured above.
If ;you enjoy texturing and are trying to branch into different art styles, try picking a simple game asset from one of your favorite game series and do something with it you haven't seen before. Fun exorcise and really flexes those texture painting muscles.
Here is the ArtStation post:
Labels:
3D,
art,
game art,
game asset,
game dev,
legend of zelda,
low poly,
prop,
shield,
video game,
weapon,
zelda
Tuesday, August 9, 2016
"Potato Masher! RUN!!!"
This is a low poly M24 grenade (WWII) that I created in front of my last class.

The lesson was on creating normal maps starting with a high poly to low poly bake using a standard 3D package. Part 2 of the assignment is to go in and add the finer details using the xNormal Photoshop Filter and then overly the two normal maps together to create a single map with all the detail of both types of normal map creation.

The lesson was on creating normal maps starting with a high poly to low poly bake using a standard 3D package. Part 2 of the assignment is to go in and add the finer details using the xNormal Photoshop Filter and then overly the two normal maps together to create a single map with all the detail of both types of normal map creation.
Here is the ArtStation post:
https://www.artstation.com/artwork/9kJWW
Labels:
3D,
3D model,
art,
game art,
game asset,
game texture,
grenade,
low poly,
M24,
texture,
video games,
WWII
Saturday, August 6, 2016
This is my ax... There are many like it but this one is game art...
Here is a low poly prop and texture I recently created in front of my class to discuss texture workflow and storytelling within your texture.
Modeled in Modo
Textured in Photoshop
Texture Painted at 1024x1024
Marmoset Render 512x512 diffuse only

To create a good looking, realistic game asset, you first want to collect your images for the base materials.
Ask yourself these questions:
What is this asset made of?
How is this asset constructed?
Where has this asset been?
Once you've made those decisions, you can begin finding the right source images to create your base metal, plastic, wood, screws, bolts etc... Now using PS, place/rotate all your source images to your assets UV shells. Once everything is in place and seam free, you can begin adding additional shading that the images did not supply but you want to create based on your concept.
After you have a nice looking asset that looks new from the hardware store, it's then time to give your asset some personality. This is where the "Where has this asset been?" question comes in. Has this item been used as a weapon? Has it never been used but been sitting in the back of an old truck or tool box for the past 5+ years? These are the things that will help you decide if you need dirt, dust or blood...and how much!
With every asset you make, you'll want to get better at asking yourself or your art lead these questions and then use the answers to help push your texture to a more interesting place.
Modeled in Modo
Textured in Photoshop
Texture Painted at 1024x1024
Marmoset Render 512x512 diffuse only

To create a good looking, realistic game asset, you first want to collect your images for the base materials.
Ask yourself these questions:
What is this asset made of?
How is this asset constructed?
Where has this asset been?
Once you've made those decisions, you can begin finding the right source images to create your base metal, plastic, wood, screws, bolts etc... Now using PS, place/rotate all your source images to your assets UV shells. Once everything is in place and seam free, you can begin adding additional shading that the images did not supply but you want to create based on your concept.
After you have a nice looking asset that looks new from the hardware store, it's then time to give your asset some personality. This is where the "Where has this asset been?" question comes in. Has this item been used as a weapon? Has it never been used but been sitting in the back of an old truck or tool box for the past 5+ years? These are the things that will help you decide if you need dirt, dust or blood...and how much!
With every asset you make, you'll want to get better at asking yourself or your art lead these questions and then use the answers to help push your texture to a more interesting place.
Tuesday, August 25, 2015
Subscribe to:
Posts (Atom)